 You've never carved a plaster sculpture before? Well, you'd be in the company of these first level students, most non-art experienced, who found it a completely absorbing, surprising, and very satisfactory 1st time sculpture adventure. To be honest, there were some frustrating moments--like when parts of the work would break off, and then having to modify the design and keep on going. But it was challenge met with determination and the discovery that one could adapt to a needed restructure and find it was pleasing as well as workable. GETTING STARTED You'll need the following for each person: Plaster of Paris, small, empty milk carton-about half filled with cold water, a paint stirring stick (preferably with holes in it),a teaspoon, bowl with plaster powder, and a newspaper covered area.
Add teaspoons of plaster powder to the water in the milk carton sifting it evenly. Continue until there is a "little mountain" that rises in the middle. Sprinkle in a few more teaspoons around the sides.
Stir the mixture slowly with the stick without lifting it from the carton to keep as many air bubbles out as possible. Check the stick several times to see if any lumps appear at the end of it. Stop when the stick shows only a smooth, stirred mixture.
Use the stick to swat the container on the outside from the bottom upward many times to release air bubbles. You can see them popping.
Set containers aside to harden. Now we're ready for an adventure! A FEW TOOLS HELP BRING PERFECTION 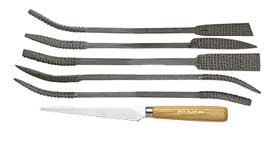 After the plaster has been removed from the carton, we started carving it with a knife. I like to use a "fettling" knive, usually used in ceramics, because of its size and flexibility. The bottom knife in the left illustration is an example.
At this stage, the block is very damp. Large chunks of material can be easily removed. It's important to keep "connectivity" in mind, and carve areas from side to side. At this stage, the block is very damp. Large chunks of material can be easily removed. It's important to keep "connectivity" in mind, and carve areas from side to side. 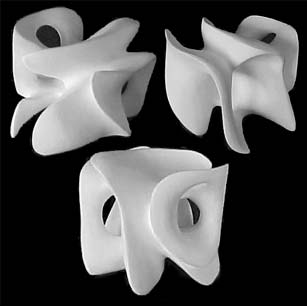 There was only 1 requirement for this first undertaking. The sculpture had to be "open", that is, you could see through it, unless a specific solid shape was desired. Students were encouraged to draw lines on the sculpture, and move them across all the sides of the block in some way.
Everyone, at last, had started.
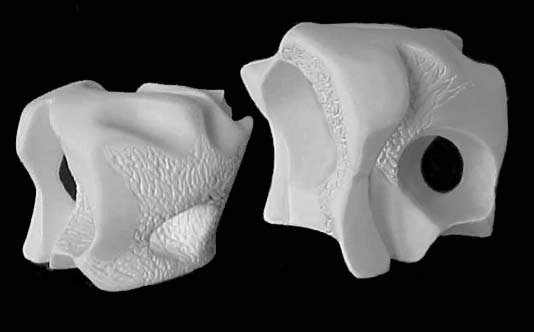
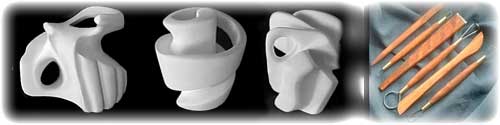
The photos show 3 different views of a completed demo, a sculpture with 2 "openings". 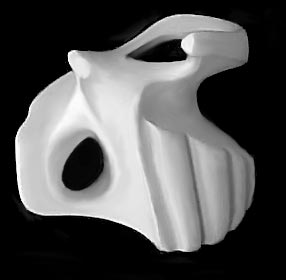 Once "lines" had been drawn and cut around the block, students were encouraged to "lose" the corners, rounding off some of the edges--but a little at a time. One must remember: once the shape it cut, that piece is gone forever. Little by little, we understood how to make shapes come forward (by cutting away whatever is around it,) or recede (by cutting it back). The left block shows this very nicely, especially on the right side. While the initial work is continuing, the block is kept wrapped in very damp paper towls, and put away 'till they are needed again.  Now, I'll tell a little secret about the last sculpture. After it had been completed and was dry, an area broke off. If you use your imagination and visually bridge together the left upper segment to that of the right, you have an idea of what it originally looked like. Now, admit it. If I hadn't told you would you have felt that something was missing? Even so, it stands as a very good piece, don't 'ya think? 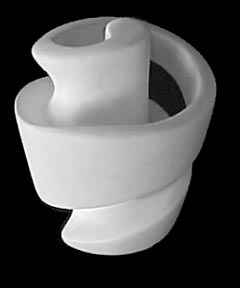 Learning to make shapes come forward and recede was achieved very well here. 3 widely curved lines were drawn around the top sides of the block, and the areas behind them were cut away to the middle of the block. The second step was to cut away the front surfaces of the curves leaving the walls raised and thinned at the top. The form is cut layered like a wedding cake, with the widest and heaviest portions at the base. 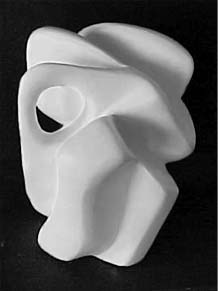 This design was one of many other similar challenges--that is, thinly cutting areas away from the inside without breaking the exterior forms. The designs' simplicity is somewhat misleading as to the care that had to be taken in its total curvature and openness of form. Exciting challenges can really be met by novice sculptors. 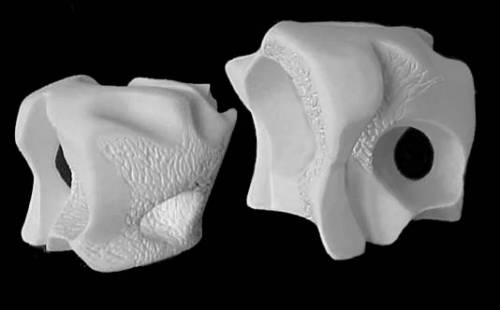 Four diagonal curves across the block scored the beginning of this form. A massive form, it stands with stability although the base is reduced in size. The extending shapes vary in thickness with the thinnest form containing an opened view. After the forms are established, the "riflers" (top 5 tools)are needed. This begins the next step: stage 1 of finishing. The riflers remove the rough cuts of the knife and begin smoothing the contours and planes of the sculpture. TEXTURE ADDS DETAILS TO SCULPTURE The addition of texture to a sculpture changes the original vision entirely. For "first timers" students were a bit apprehensive about doing this. It meant finely cutting into a fairly smoothed surface and worry about breakage, depth of design and resurfacing the work again. But once a few people began the venture and satisfactory results were being achieved, more and more jumped in and scored away. Texturing can become part of the entire surface of the sculpture or be especially limited to particular areas. This aspect was the most popular. Let's see a few. 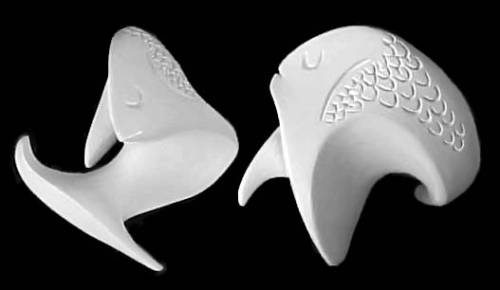 Texture incised into special interior and exterior areas of this form greatly added interest and contrast to its smoothed surface. The texture is added after the form has been successively sandpapered from medium to fine in a dry state. With an etching tool, ceramic needle, carpentry nail, dentist tool, leadless lead pencil, etc., very fine lines can be incised into the surface. They should be deep enough to withstand 2 more finishing techniques. Should the textures lose some desired depth, they can be recut when the final sanding process has been done. 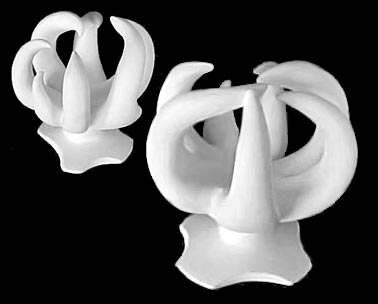 This sculpture was very light, nicely curved and very well balanced. With just a few textural lines, "scales" brought strong visual content to the design with ease and simplicity. It gives credence to the adage "a little goes a long way" This sculpture was the most surprising of all. Not one of the long, slim, adjacent forms broke in any way. Just to think about maneuvering knives, riflers, sandpaper and cloth throughout all the forming and finishing processes, and end up with such a delicate, complex design was to me just outstanding. There is no "opening" nor additional texture. The design is complete as is. 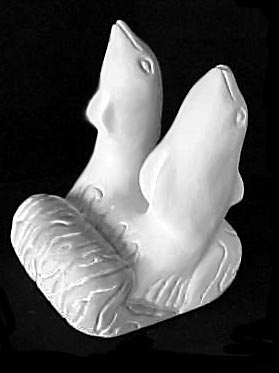 This sculpture shared the same challenge as the one above--the need to design and work on adjacent forms without harming one or the other. The texture here was reminicent to the sculptor of washing waves of water, and is limited to the supporting base. Isn't is amazing what can be derived from a small block of plaster? THE CARVING AND FINISHING PROCESSES Perhaps you've noticed the very smooth surfaces the sculptures exhibited. That was due to no less than 2 weeks of critical sanding and buffing. Here's the sequence we followed:
Initial planning and cutting out of form with the fettling knife.
After shaping has been roughly determined, riflers were used to reform and more clearly define the sculpture's contours. Material is damp to this state.
Plaster is allowed to dry. Medium sandpaper removes the marks from the riflers' which had made many fine, linear cuts. This is followed by fine sandpaper removing the previous marks.
The final finishing step is using 1" strips of torn muslin, about 12" long. This strip is soaked,excess water squeezed out, wrapped around the finger and rubbed all over the entire surface until no marks or air bubble craters are seen. This "buffs" the plaster and creates a velvety smooth surface.
Last, 2 to 3 coats of milk is painted over the plaster. Yep, milk. This is absorbed into the material, helps to seal it and gives it a translucent shine.
Quality in craftsmanship enhances the worth of a sculpture when excellence in finish can be observed. This takes a lot of time and effort, but it is so worth it!
Source: http://www.mmwindowtoart.com/3d/plas1.html |