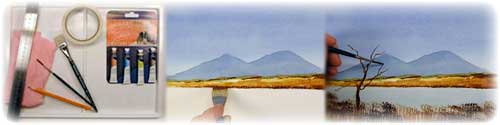
 The materials you require for this lesson: 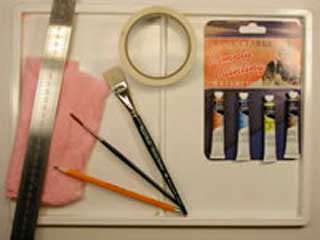 3/4" Simply Painting Brush and the No. 3 Simply Painting Rigger Brush.
Paints: Cobalt Blue, Raw Sieena, Lemon Yellow, Burnt Umber
Sheet of 7" x 10 " Cotman, Water colour paper.
Pallette or White Plate
Water Container, Cloths, Pencil, Eraser & Ruler.
Masking tape and a stiff board to affix your paper. Watercolor painting Video guide part1
Watercolor painting Video guide part2 Take your sheet of paper and place it long ways on your board and fix it on all 4 corners.
Then take your ruler and pencil and draw your horizon line approximately 1/3 of the way up from the bottom of the paper, making sure it's equal distance on each end.
Now the colours that we need are as follows - cobalt blue, raw sienna, lemon yellow and burnt umber. So put those four colours out on your palette, keep them to the side and it leaves plenty of room for mixing in the center.
Next using the 3/4" Simply Painting goathair brush dip into the water and take some of the cobalt blue paint and bring it out towards the center. Mix enough paint to allow you paint your complete sky.
Now using the 3/4" goathair brush, starting from the top, paint down to within approximately 1/2" of the horizon line. Leave the last 1/2" clear. 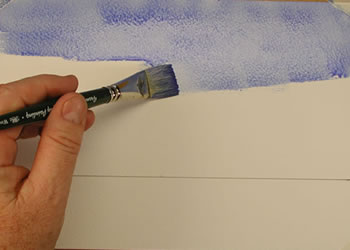 Now let the sky dry or, of course, if you want you can use a hairdryer and dry it a little quicker. But if you are using a hairdryer keep the hairdryer approximately 3" - 4" away from the paper. That's the tip of the hairdryer, otherwise the air from the hairdryer may disturb the pigment and you don't want that.
If you don't have a hairdryer you can let the sky dry naturally. You will notice it is dry when the sheen has gone from the paper and it is a mat like finish. It usually takes 3 - 4 minutes. This time we have left a completely blue sky. It's summer time, so we didn't take any clouds out as we did in the first picture. 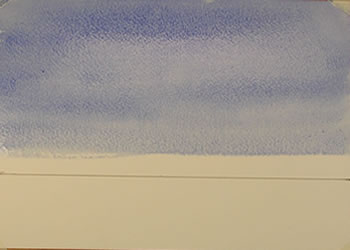 Now if you want you can lightly draw in your mountains. This is something you will do in your first couple of pictures, but in time you will find it is not necessary to do this, and you will just use your brush to paint the mountains in directly. 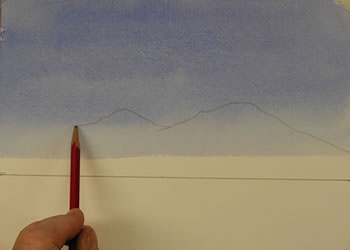 Next, having made absolutely sure that the paper is dry, we can now paint the mountains. This is done with a mixture of very little raw sienna, about 10%, and 90% cobalt blue, mixed together on your palette.
We are now ready to paint the mountains. So with the 3/4" goathair brush, using the corner and keeping it flat on the paper, go right across the outline that you have drawn of the mountains.
Then to finish it off, fill in the bottom. You will notice that I start on the right-hand side of the paper and work from right to left. Well, there is a reason for this, I'm left-handed. If your are right-handed, as most people are, you start on the opposite side, in other words, the left-hand side and work across. When you have completed the mountains you should have a gap of approximately 1/2", maybe a little more, between the horizon line and the bottom of the mountains. This is the area where we are going to put the rest of the middle ground in. 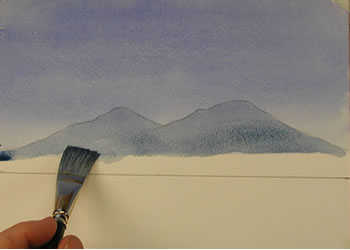 So while our mountains are drying, let's now make up the colour we need to paint that middle ground. First clean your brush in the water, then take some of the raw sienna and lemon yellow and mix them together, about half of each. Make sure you are using raw sienna. It is the mustard or lighter brown colour and that is mixed with the lemon yellow.
Then with the brush, once again the small goathair, held like a chisel go across the paper.
You can, of course, go up onto the bottom of the mountains with the paint and this will give you a second colour because what's happening is, because watercolour is transparent, the underneath colour is showing through and darkening your raw sienna and lemon yellow mixture. This is something that all watercolorists do and, of course, it gives you another colour to play with, so to speak.
Now carry on down, still keeping the brush working like a chisel, with movements from right to left or left to right, depending on which way you want to work, fill in right down to the horizon line. Do leave some gaps of white where you don't paint. It adds a texture to the picture. 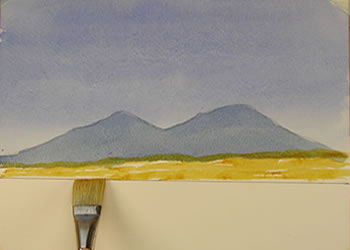 Next when you have reached the horizon line, back to your palette, without cleaning your brush add some burnt umber. This is the dark brown colour to the tip of the brush. It is not necessary to clean your brush before this because, of course, you are adding a darker colour paint.
Now, once more, go across the paper; put in some dark colour up at the top, which is just underneath the mountain first. This creates a distance effect.
Now to finish off the middle ground back into the burnt umber again, making sure the brush is quite dry. Just on the horizon line darken it to represent your river or lake bank which would have some muddy substance or some rushes. This is done by keeping the brush almost vertical and dipping it onto the paper as you go across. When you have completed that have a look at your picture. Enjoy it. You have now completed the horizon, sky, middle and now you are going to go down into the foreground, which, of course, first of all is water and then your reeds. 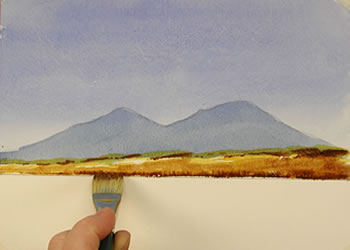 Once more let your riverbank dry before you proceed. There is a reason for this. When you paint in the water the brush may tip the wet paint on the riverbank and it will muddy your water. So the rule is make sure it is dry before you proceed in exactly the same way you did with sky and the mountains. Now when your paper is dry, you can of course use your hairdryer if you wish, we now need to make up a mixture. This is done taking some cobalt blue and, once more, very little of the raw sienna, approximately the same amount you used for your mountain. Make up sufficient paint to allow you to paint all the water in, don't leave yourself short or you will have to stop and do it again. You don't want this. You want to make sure you mix sufficient paint to complete the task.
Take your time mixing the colour and be careful you don't mix too much of the raw sienna into the blue or you will get a greeny colour which you don't want. Look at the colour of the paint I have mixed on the palette, that's what you need.
Next, without further ado, let's fill our 3/4" goathair brush up with the paint and starting on whichever side you prefer place the brush flat on the paper.
Without stopping go straight across from one side to the other.
Now repeat this underneath the first stroke. It may take you two or three strokes to complete this, that's fine, but always remember to complete what you start. When you start you go straight across without stopping. 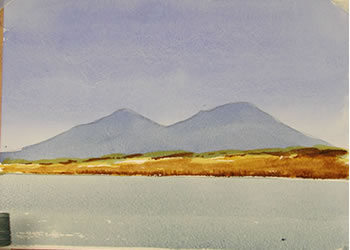 We have now reached the bottom of the paper and the foreground proper. What we are going to do next is put in some reeds or rushes and to do that, first of all we need to dry our brush. This is done by resting it on our cloth, leaving the tip of the brush protruding over the end of the cloth. This ensures that the body of the brush is dry and the tip of the brush has some moisture still in it. Do this on both sides, turn the brush over. 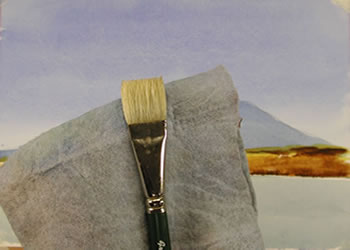 Then dip the brush, hairs first, into the raw sienna and burnt umber,
so the tip of the brush is filled with pigment.
Then, using downward strokes, go right across the paper to create the effect of rushes or reeds
It will be necessary to reload your brush several times to create this effect but there is no need to add water to it, just pigment. When you have reached the far side of the paper you can, if you like, add in some darker colour here and there. This is made up of burnt umber only without any of the raw sienna and just here and there create dark areas of reeds. When you have completed this, stop. 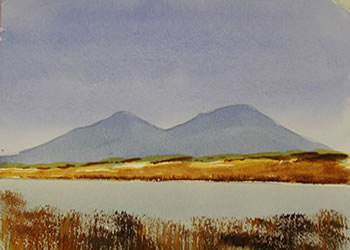 Now, let's go a little further with this picture. Let's add in a little bush or tree. To do this we need to use our rigger brush, our Simply Painting No. 3 rigger brush. Now there is a difference between the goathair and the nylon brush, particularly a small one like this, that is that it holds a lot less paint and, therefore, we have to make up an inkier type mixture. In other words we need more water. So taking some of the burnt umber with the brush, using plenty of pigment let's make up a mixture about the same texture as inkNow starting from the bottom up, because as I say, that is the way the trees and bushes grow, pressing down on the brush, which will spread the hairs, go up the paper. As you go up the paper slowly lift the brush until only the tip of the brush is resting on the paper. This will create the effect of a thinner line, so the harder you press down the wider the line, the lighter the brush touches the paper the thinner the line.
Repeat this to create the skeleton of the bush. When you have completed this you end up with a tree with no leaves. 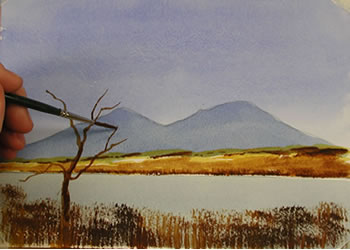 Dry the 3/4" goathair brush on your cloth, then to create the leaves, using a downward action, dip the brush firstly into the lemon yellow and then into the thick part of the burnt umber, not the inky portion that you used to built the trunk of your tree.
Now using a downward stippling movement dab on the leaves on the tree
Make sure you put leaves in the center of the tree 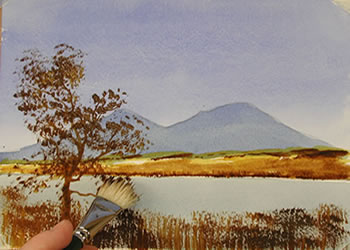 Now add the bird as a flat letter "V". 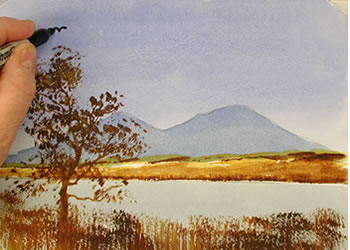 Work finished! http://www.simplypainting.com/Free-Painting-Lessons/videos/organise.asp
Source: http://www.simplypainting.com/Free-Painting-Lessons/Watercolor-Painting-Lessons/intro.asp?lessonID=21 | 