By Natascha Roeoesli Web: www.tascha.ch Email: n@tascha.ch
Hair comes in layers
This means you have tons of single hair and strands laying on top of eachother and like any other element like normal fabric for example, it casts shadows and interacts with and on itself. As a matter of fact I think clothing is in it’s nature pretty close to how hair reacts - you can look at it as just some special kind of fabric somehow..
Hair comes in Strands
Something very important to remember is that even though you might have single hair visible - they always clumb together and cling onto eachother.
Hair is messy
Even if you try to comb your hair fully straight - you will always have some single strands or hair which go the total opposite direction. Use this knowledge and be brave if you paint hair.
Hair has a depth of field like everything else
If you look at a photograph you’ll notice that hair get’s more blurry the further away from the focus it lies. That’s actually general DoF theory but a lot of people keep forgetting to apply this to hair as well.
Hair colors are different then they seem (how to pick colors)
Black hair has most of the time blueish/purplish/lilaish highlights or at least they appear like that
Red hair has extrem orange tints as higlights
Never use pure yellow or gold for blonde hair. Use greyish yellows and cold brown tones instead - even greens or reds work.
In general it is hard to explain how you should go about picking colors for hair but there are some tricks I use:
Always start with the darkest color (shadow) and go from there
Use a brush and set it to low flow for starters. That will make the background color shine through slightly. Later on you can go and colorpick from that color to establish more depth.
Mix some of the skin color and background color into your hair (yet again low flow for the brush - so it mixes with the tones you already have set down if you don’t want to pick the actual color)
Brushwise - start BIG and end small
Ok, now for an example. Explanation first, then you’ll see the image which will hopefully help to make my muttering a bit more understandable.
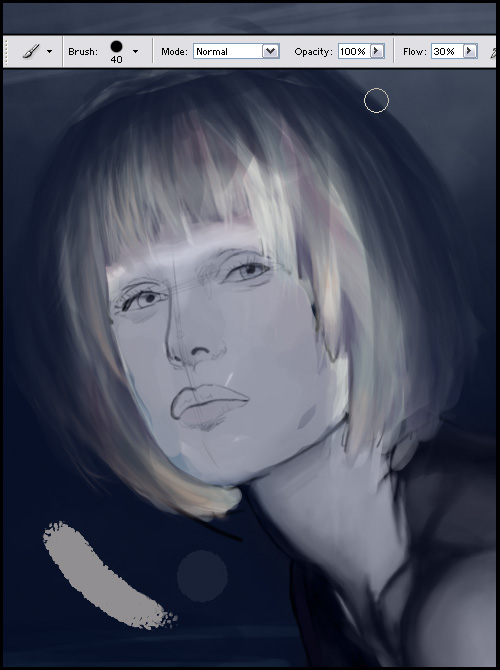
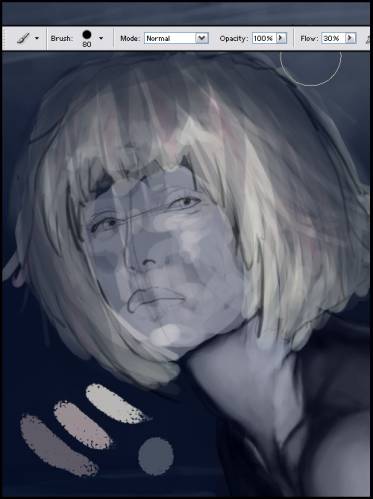
Assuming you have a sketch or at least a general idea to work from, start to block in the main form of the hair with a dark color.
Don’t worry too much about single strands or hair at this point but make sure to leave it pretty rough. It doesn’t hurt to have some basic flow and directions in there however.
I was working very big for this image which means I used a brush at low flow and 80 px tip (flow and size set to pen pressure). Like I said, if you work with low flow the background color will shine through a bit and leave you with already some tons to work from.
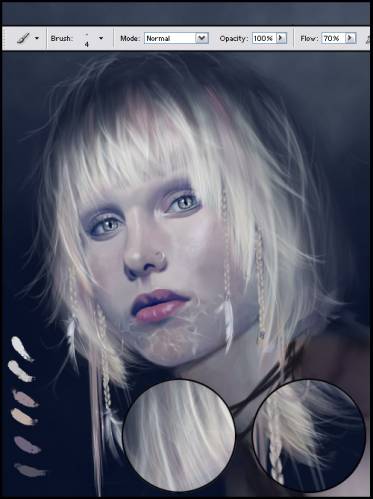
I scribbled wildly while switching between a lighter shade of the background color, some color I wanted to use for the skin later on and a the highlight color - but very roughly and lightly. The base color for this is a bit of an exception because that overall setting is very dark (night). Normally you would go and pick the shadow color of the main haircolor you want, to start with.
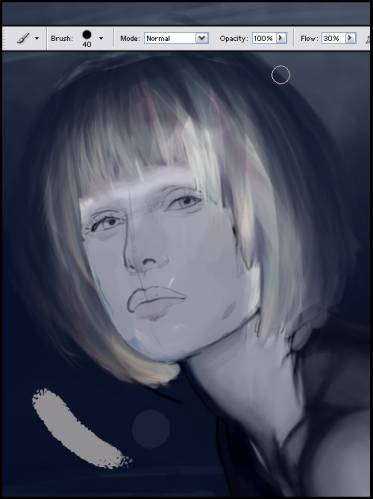
It is very important to go from darker to lighter as you work on the hair.
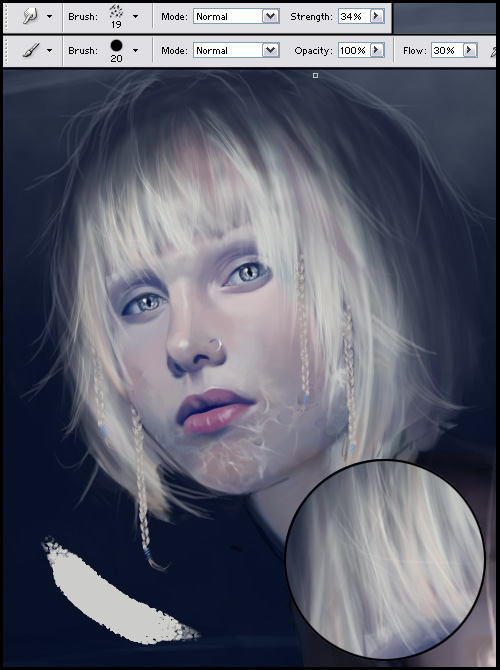
At this point I color picked a midtone from the color chaos I had from the first step and used it to define the hair more. I went in and started to define the hair over her forehead a bit more in detail with a smaller brush tip. I also went back in and used the background color on low flow to give her head including the hair a more roundish 3D feel.
Now you probably already noticed that naturally you got darker and lighter parts and hairstrands automatically start to come forth or fall back (even if you didn’t plan on them). While color picking from the colors (dark and lighter part alike) you can go about to work this “accidents” out more to emphasize strands that lay on top of others.
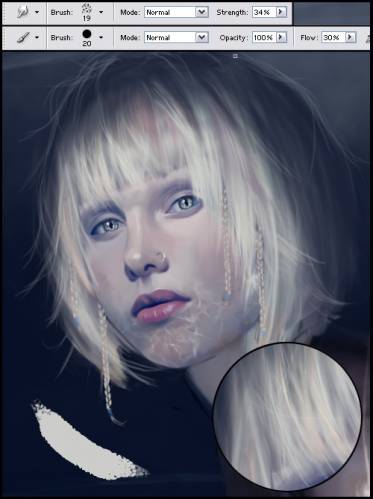
At this point I started to pick the brightest color I had so far and started to paint in single strands. This means I go about painting stroke by stroke until I have a strand of hair established (which basically takes a lot of patience). Don’t forget to totally change direction for some single hairs and don’t go all over your hair but leave some parts darker or don’t add a brighter color to certain areas at all (keep the lightsource in mind). Depending where your light comes from and depending on the volume of the hair, this is basically some knowledge you need to have (or rely on a picture if you have to). I myself go with feeling here and it might not be the most realistic approach but it does work for me for now.
Also make sure to vary the pressure you apply to your brush which is an easy way to work out hair volume. Start lightly and apply more pressure in the middle of the hair/strand where the highest part would be and take back pressure as you go down or unto the shadow of a strand.
Once I have some basic hair/strands laid down I use the smudge tool and a special brush (see image) to smudge all over it again. (Make sure you follow the hair flow while smudging though) which basically leaves me with a nice starting layer to work from. You will also notice that the brightest color will get toned down again while smudging - which is what we wanted to happen.
Now for the real fun!
Our smudge layer works as a nice base for more detail work. Make a new layer.
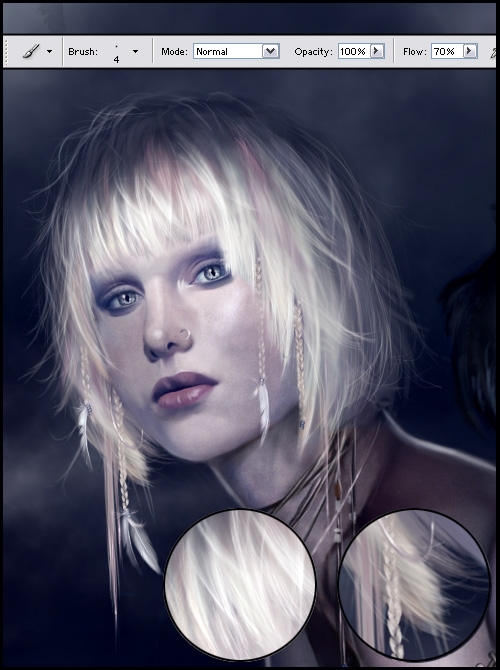
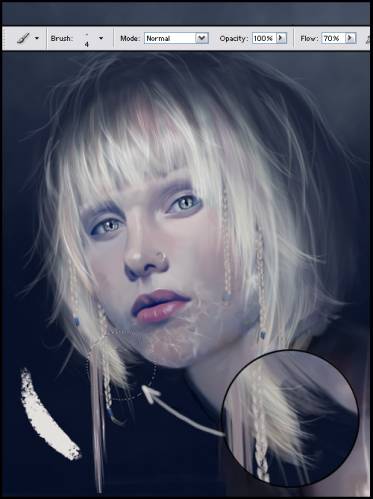
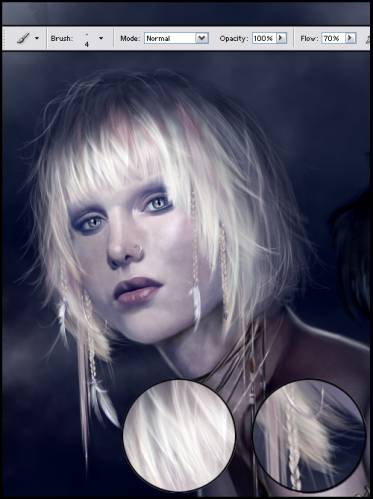
With the settings you see in the image I go about repainting strands. Once more, tons of strokes to work out those strands and hairs. You can actually reuse the color you used for the earlier step before the smudging or you can go and use a slightly brighter version of the previous one.
The strands you paint now will automatically appear to be on top of the base we made earlier due to the fact that they are sharper then the smudged layer beneath it, for now. What we are doing here is creating some depth of field basically which is probably good to see at the closeup in the image and the ends of her hair close to her chin. Normally you would smoothen those endings out to not make them look as harsh and stubbly but I wanted to go for a roughly cut look, so I left it quite harsh.
There are several ways of going about to render the tips of hairstrands or free flowing endings. You can either smudge them out carefully, use the airbrush tool or use a little trick that works for me for hair which is further back on the head: Simply colorpick the background color and use a huge brushtip with very low flow. Then go about painting very carefully and slightly over the parts you want to tone down a bit. That also works for most elements that lay further back in your painting. It’s however a very rough and messy way of creating some depths.
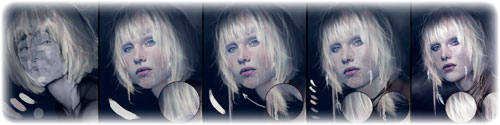
Now what? Well, we are in the rinse and repeat stage
Flatten the hair layer and smudge it out again (bored yet?). From here it’s basically the same again: Create a new layer, pick a brighter color, work out more strands (strokes, strokes and more strokes) and lay them on top of eachother. Color pick from the whole range of values you have in your hair now. If you have to, even go and deepen the shadow parts with several single strokes but be careful with that. You’ll notice, that by now you should have a quite huge range of different color values (this is probably a strange example since she doesn’t really have what I would call “normal” colored hair.)
Depending on how much patience you have, you can go on as long as you like. The more you do the more realistic it will look.
Before the final step of this painting I picked another highlight color (in this case ALMOST white - it’s not a pure white though but a shade of the main lightsource color) and put focuse on some special strands.
Make sure you vary both your brush tip and the flow and pressure you use while painting A LOT. It helps creating some dynamic in your hair.
This rule, by the way, applies to painting in general.
To finish up - smudge out endings and parts that lay further back and go over parts that are in focuse with a sharp edged brush one last time.
Voilà, after some more time and a bit too much oversharpening (I would actually go back and change quite a few things on this but it works for now
Source: http://www.tascha.ch/content/index.php?option=com_content&task=view&id=17&Itemid=34 |