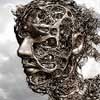
 Introduction For years now, ZBrush users have been begging and pleading for an upgrade, but kudos to the Pixologic team for holding their ground and not releasing a new version until the features were something to sing about. Well, it has finally arrived and it was worth the wait. ZBrush 3.1 is stronger and more innovative than ever. From simple user requested improvements such as the ability to load custom brush presets to major new developments like MATCAP and the inclusion of ZMapper and the Displacement Exporter, the new version of ZBrush extends the revolutionary nature of the product even more. ZBrush is a revolutionary software package that enables digital artists to enhance images and objects using a set of unique brushes and sculpting tools. ZBrush includes several brushes that actually let you paint in 3D space by pulling the brush strokes away from the surface. It also includes the ability to load and work with 3D objects to paint and sculpt right on their surface providing a tool for adding surface details like wrinkles, popping veins and musculature. Another huge improvement for ZBrush is the enhanced performance including multi-threaded support for up to 256 processors. ZBrush is also available for 32 and 64-bit systems. The ZBrush Interface Whether it’s the dark background of the interface (Figure 1) or the pop-up tool palettes that litter the screen, the ZBrush interface is definitely an acquired taste, but you don’t need to feel trapped with the interface. ZBrush 3 is now completely customizable. Whether creating your own palettes or adding a new button, the interface is in your hands. You can alter the layout, the hotkeys, or even load custom scripted features at startup. Figure 1: The ZBrush interface has been updated and refined in version 3.1 (click for full-size) The key to working efficiently in ZBrush is to use the keyboard hotkeys. In version 3.1, you can quickly assign hotkeys to those tools that you access the most often. To assign a new hotkey, simply hold down the Ctrl key while clicking on the tool to associate with the hotkey, then select the hotkey and it is assigned. The assigned hotkeys can then be saved using the Preferences, Hotkeys sub-palette. Brush Improvements Working with brushes is one of the key areas of ZBrush and the improvements to the brushes endow them with even more power. Each brush is now its own icon in the Brushes palette (Figure 2) and the configuration settings for each brush is saved for easy recall. You can also save and load your own custom brushes that appear in the palette. Figure 2: ZBrush 3.1 includes many new and interesting sculpting brushes (click for full-size) As if ZBrush didn’t have enough brushes, the new version has introduced several new brushes to the mix including the Blob, Clay, Layer and Stitch brushes. The later brush quickly makes scar stitches (Figure 3). Figure 3: The Brush palette holds many new interesting brushes like this one that creates stitches (click for full-size) Brush can now use two new modes--Color Masking and BackFace Masking. The Color Masking mode lets you paint while all objects of a certain color are masked. This is helpful for focusing your painting efforts without touching an area that is already looking good. The BackFace Masking mode automatically masks all normals that are pointing away from the camera. This keeps the backside of your model safe from changes as you paint on the front side. When painting, you can enable the Lazy Mouse mode, which slows the mouse movements down to a steady even stroke. This gives you a precision that you don’t have when rapidly moving the mouse around. This mode can also be used with a supported graphics tablet. With the Cavity Masking feature, you can cause that all the recesses of your wrinkles are masked so that once the wrinkles are good, you can keep them from being edited while you make larger changes to the same area. The ZappLink feature has been improved and provides better support for integrating Photoshop or another image editing package into your workflow. Photoshop layers can even be used as masks within the ZBrush interface. Sculpting with Alphas, Gravity and Symmetry ZBrush now allows you to use any of your Alphas as a sculpting tool. You can even create and load your own Alphas into the interface. The Gravity feature will automatically pull wrinkles and folds downward as if gravity were pulling them into place. You can control the amount of gravity and even its direction. It creates a natural looking result. The Poseable Symmetry features lets you specify a symmetry axis and all sculpting or posing of the model done to one side of the model is instantly made to the opposite side. Since most characters are symmetrical, this is a huge time-saver allowing you to quickly add details to your characters. Transposing models and 3D Layers Once a character is created, moving it to a custom pose can be tricky, but ZBrush includes a new Transform feature that lets you repose your character by drawing an action line that you can manipulate. The character follows the line movement making it simple to move the character into a custom pose. 3D objects can be split into layers, which provides a way to organize your creations into easily selectable groupings. Layers also make it possible to create multiple versions of a model such as a new shield and a damaged shield in one file. MATCAP and Realtime Shadows You may know that mocap is short for motion capture, but ZBrush sports a revolutionary new feature that it is calling MATCAP, which is short for Material Capture. This feature lets you create a surface material along with any lighting details by simply sampling some points from an existing image that looks like what you want. During the sampling phase, you can specify which way the normal at that location is pointing. This defines how the light is cast on the model. You can also set the specular normals for the highlight. All parameters for the material are loaded into a palette where you can change them and the material becomes available in the Material palette where it can be applied to the current object. To get started, the MATCAP feature includes several material presets including Red Wax, Pearl Cavity, and White Cavity. Figure 4 shows a head model with the Reflected Map preset applied. Figure 4: The MATCAP feature can pull materials from an image (click for full-size) Within the display view, ZBrush supports realtime shadows that give your models a wonderful sense of depth without waiting for a render. These shadows are also valuable as your sculpt giving you immediate feedback on your work. Working with HD ZBrush models with the ability to sculpt and subdivide, often get huge, like several gigabytes huge. The new HD Geometry feature lets you sculpt and divide your objects up to 1 billion polygons. Yes, that’s 1 billion, which should be enough for any project. Even though you divide the model into a obscene number of polygons, only those polygons that are visible are displayed making your system response despite the model size. With Local Subdivision, you can increase the mesh resolution at specific areas without increasing the overall polygon count in areas such as the back of the head that doesn’t need the extra resolution. ZMapper and Displacement Exporter As the next-generation game consoles get more and more powerful, game development teams can take advantage of normal maps to apply high-resolution details onto a low-resolution object. The results are amazing as we’ve seen in several recent games including Gears of War. Within ZBrush, the ZMapper module is used to create and view normal maps. The generated normal maps can be easily exported from ZBrush for use in Maya, 3ds Max or SoftImage XSI. One common use of ZBrush within many game studios is to create a high-resolution model of a game character using ZBrush’s sculpting tools. The resolution created by sculpting a model is then saved as a displacement map that can be used within your default 3D package to recreate the high-resolution sculpted model. This high-resolution model can then be used to create a normal map that is applied to a lower-resolution model. ZBrush’s Displacement Exporter tool is a plug-in that allows sculpted displacement maps to be exported as 8, 16 or 32-bit RGB or grayscale maps. It also includes the ability to convert the displacement maps directly to a normal map saving a ton of time. You can even enter and reuse the configurations that other users have successfully used to streamline the exporting process. Record your Successes The new Movie palette isn’t an animation system, but it simply allows you to record your steps for use as a tutorial or to show-off a technique. You can also create a turntable view of your current model with the Turntable button. This slowly rotates your model about and provides a good way to display your work. Summary Overall, ZBrush 3.1 is a healthy revision to a unique product. For game developers the ability to sculpt to create high-resolution models that can generate a normal map is a tried and true process for enhancing game characters. ZBrush is a professional level tool and will require some time to master, but the results can be stunning and worth the effort. ZBrush is also well supported by a strong community at www.zbrushcentral.com. If you’re struggling with the package, you can find your answers here. There is also a 30-day trial version of ZBrush available as a free download on the ZBrush web site. ZBrush is available for Windows and Macintosh. For more information on ZBrush, visit the Pixologic web site located at www.pixologic.com. Kelly L. Murdock is the president of Logical Paradox Design, a design firm specializing in 3d graphics. He’s written extensively on 3d graphics including books on 3ds max, Maya, LightWave and Poser. by Kelly L. Murdock
http://www.gamedev.net/features/reviews/productreview.asp?categoryid=35&productid=670
| 